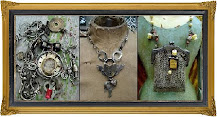
this is a manikin that i started altering back in Oct. that i just finished last week! it sort of got put in a corner until i had time to get back to it. my husband picked it up at a barn sale for $10. it had this hideous orange fabric that still grosses me out when i am looking at the picture. something about the texture of that fabric - ick. so it was covered in that awful fabric and it had these open areas and all these screws on the inside. i think the open areas were meant to be able to manipulate the size and shape of the manikin. (i'm guessing here). but somewhere along the way, it became difficult to make the pieces all flush. so thus i decided if i was going to be able to do anything with it, i would have to cover the open spaces. so that's where i decided to do paper mache (or whatever that stuff in the box is - the strips that you dip in water). so i got the whole thing covered in paper mache and then that is where i stopped working on it. then recently as i've been making more jewelry, i thought it'd be perfect to model my pieces in photos. so i decided to finish it. i collaged old pattern pieces over the paper mache. then i dry brush some gesso over the pattern paper to tone it down a bit.
Thursday, May 29, 2008
this is a manikin that i started altering back in Oct. that i just finished last week! it sort of got put in a corner until i had time to get back to it. my husband picked it up at a barn sale for $10. it had this hideous orange fabric that still grosses me out when i am looking at the picture. something about the texture of that fabric - ick. so it was covered in that awful fabric and it had these open areas and all these screws on the inside. i think the open areas were meant to be able to manipulate the size and shape of the manikin. (i'm guessing here). but somewhere along the way, it became difficult to make the pieces all flush. so thus i decided if i was going to be able to do anything with it, i would have to cover the open spaces. so that's where i decided to do paper mache (or whatever that stuff in the box is - the strips that you dip in water). so i got the whole thing covered in paper mache and then that is where i stopped working on it. then recently as i've been making more jewelry, i thought it'd be perfect to model my pieces in photos. so i decided to finish it. i collaged old pattern pieces over the paper mache. then i dry brush some gesso over the pattern paper to tone it down a bit.
Subscribe to:
Post Comments (Atom)
.jpg)












.jpg)
.jpg)



.jpg)


Kecia what a fabulous make over. It looks wonderful
ReplyDeleteAlison
she looks much better now that you redid her, that fabric was gross and i must say i love that necklace on her too especially the centerpiece photo..very nice sweet k......
ReplyDeletexoxo
Great job. Looks much much better than the orange!
ReplyDeleteYou were right about all of your guesses. They used to have these long metal strips that went over the screws and you could bring them up or down to meet the needed size. They usually went from size six to twelve and they were made for the person who did her sewing at home unlike the professional ones that were made of wood and soft canvas of determined sizes. Singer company used to sell them at their stores.
ReplyDelete(Am I dating myself or what? LOL)
I love what you did with it and now you must find a name for it. Coco comes to mind because of Coco Chanel. Absolutely gorgeous job!
Allegra
Just fabulous Kecia!!! And she makes the perfect model for your gorgeous necklaces!
ReplyDeletecoco is a great name - good job! mom
ReplyDelete